Content Presentation and Formatting
Table of Contents
The following inline formatting elements may be used to style text:
| Element | Display |
|---|---|
| <bold> | bold text |
| <italic> | italic text |
| <sup> | superscript text |
| <sub> | subscript text |
| <underline> | underlined text |
| <strike> | |
| <sc> | small caps text |
| <monospace> | monospaced text |
Inline text formatting elements can be combined with one another if necessary. These examples show a few of the possible combinations:
| XML | Display |
|---|---|
| <bold><italic>Sample</italic></bold> | Sample |
| <sup><strike>Sample</strike></sup> | |
| <italic><sc><underline>Sample</underline></sc></italic> |
<sub> and <sup> elements cannot be combined; text cannot be both superscript and subscript.
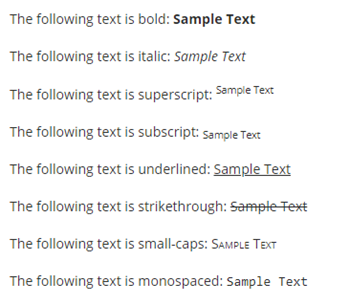
This example of inline text formatting elements:
<p>The following text is bold: <bold>Sample Text</bold></p>
<p>The following text is italic: <italic>Sample Text</italic></p>
<p>The following text is superscript: <sup>Sample Text</sup></p>
<p>The following text is subscript: <sub>Sample Text</sub></p>
<p>The following text is underlined: <underline>Sample Text</underline></p>
<p>The following text is strikethrough: <strike>Sample Text</strike></p>
<p>The following text is small-caps: <sc>Sample Text</sc></p>
<p>The following text is monospaced: <monospace>Sample Text</monospace></p>
will produce front-end display output like this:
Within the PDF, articles sometimes contain an author signature block at the end of the text. The signature block will usually contain the author name, and sometimes their affiliation or email address. This is particularly common in book reviews. A signature block may contain signatures from multiple authors.
Signature blocks should be captured using the <sig-block> element positioned at the end of the text within the <body> element. <sig-block> should not be nested within a <sec> element. Each author signature should be captured within a <sig> element contained within the <sig-block>. A <break/> element should be used for each line of text within <sig>.
Example of signature block at the end of the text within article PDF:

Example of <sig-block> tagging:
</sec>
<sig-block>
<sig>James Smith<break/>[email protected]</sig>
</sig-block>
</body>
The above tagging produces front-end display output like this:

A live example of a signature block can be seen in article https://doi.org/10.1080/15021866.2019.1597488
The <disp-quote> element is used to capture quoted passages from another work. Text captured within a <disp-quote> element is made typographically distinct from the surrounding text.
<attrib> should be used for author of quote, if present.
Example XML tagging:
<disp-quote>
  <p>In order to begin to understand nature, we had first to alter it for the worse. (Phillips <xref rid="CIT0029" ref-type="bibr">1999</xref>, 598)</p>
</disp-quote>
The above tagging produces PDF output like this:

and front-end display output like this:

A live example of a quotation can be seen in article https://doi.org/10.1080/17449855.2019.1590633
Epigraphs that are placed at the beginning of an article are tagged within the element <disp-quote> as first element within <body>.
Example tagging:
<disp-quote content-type="epigraph">
  <p>”Mithin …..”`</p>
  <attrib>(Wilhelm Grimm, 1821)</attrib>
</disp-quote>
The <boxed-text> element will render a box on the front-end HTML display. Textual elements placed within <boxed-text> will display within the boxed area on the front-end HTML display. The <boxed-text> element is used to hold textual material that is part of the body but is outside the flow of the narrative text (for example, a sidebar). The <boxed-text> element can be used for any text insert, whether enclosed in a box or not (for example, marginalia, sidebars, cautions, tips, warnings, note boxes).
Example XML tagging:
<boxed-text>
  <caption>
    <title>This is the title of the boxed-text section</title>
  </caption>
  <p>This is a paragraph within the boxed-text section'</p>
  <list list-type="bullet">
    <list-item>
      <p>This is a list item within the boxed-text section</p>
    </list-item>
    <list-item>
      <p>This is another list item within the boxed-text section</p>
    </list-item>
  </list>
</boxed-text>
The above tagging produces front-end display output like this:
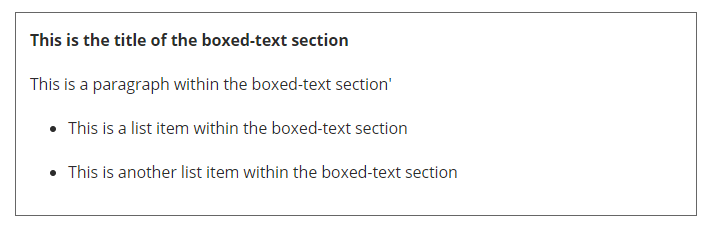
A live example of boxed text can be seen in article https://doi.org/10.1517/14740338.2016.1118050
If a piece of code is to be displayed inline within standard text, then the <monospace> element should be used to hold the code fragment. For example:
<p>The <monospace><bold></monospace> HTML element displays bold text</p>
The <code> element should be used if snippets of programming language code, pseudo-code, schemas, or markup fragments are to be displayed within the article text. The <code> element is block level and is not intended to be used inline within standard text.
The optional @language and @language-version attributes should be added to the code element if the language and version number are known.
Example: <code id=“COD0001” language=“xsd” language-version=“1.1”>
To avoid XML parsing errors and to preserve the display of the code for online presentation, the contents of the <code> element should always use hex-coded Unicode entities fragment itself.
<code id="COD0001" language="html" language-version="4.01">
<meta name="keywords" content="tagging guidelines" >
</code>
The above tagging produces front-end display output like this:

To enable internal linking, each <code> element should be given an ID that is unique within the document.
The <list> element should always be used to capture lists. The @list-type attribute specifies which prefix character should precede each list item. The following default @list-types are supported within <list> and dictate which prefix charter will display next to each <list-item>:
| @list-type | Description | Default online display |
|---|---|---|
| @order | Ordered list Prefix character is a number starting at ‘1’ |
 |
| @order with id and continued-from attributes | Continued from previous section | 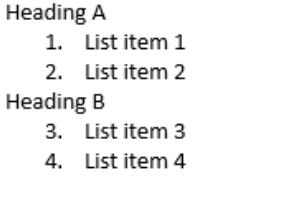 |
| @bullet | Unordered or bulleted list Prefix character is a bullet |
 |
| @alpha-lower | Ordered list Prefix character is a lower-case alphabetical character starting at ‘a’ |
 |
| @alpha-upper | Ordered list Prefix character is an upper-case alphabetical character starting at ‘A’ |
 |
| @roman-lower | Ordered list Prefix character is a lower-case roman numeral starting at ‘i’ |
 |
| @roman-upper | Ordered list Prefix character is an upper-case roman numeral starting at ‘I’ |
 |
| @simple | Simple or plain list (No prefix character before each item) |
 |
| @custom | Custom labels. | For example: Step 1 Step 2 Steps 3 |
The element <label> must be used in combination with @list-type=“custom”.
Lists that use custom labels (such as Step 1, Step 2, Step 3…) must be tagged using the @list-type=“custom”. They shall include a <label> to capture the specific numeration.
<list list-type="custom">
<list-item><label>Step 1</label> <p>List item 1</p></list-item>
<list-item><label>Step 2</label> <p>List item 2</p></list-item>
</list>
The following example shows the tagging for different list styles.
<p>
  <list list-type="bullet">
    <list-item><p>List item 1</p></list-item>
    <list-item><p>List item 2</p></list-item>
  </list>
</p>
<p>
  <list list-type="order">
    <list-item><p>List item 1</p></list-item>
    <list-item><p>List item 2</p></list-item>
  </list>
</p>
<p>
<sec id="s0001">
  <title>Heading A</title>
  <p>
    <list list-type="order" id="L0001">
      <list-item><p> List item 1</p> </list-item>
      <list-item><p> List item 2</p> </list-item>
    </list>
  </p>
</sec>
<sec id="s0002">
  <title>Heading B</title>
  <p>
    <list list-type="order" id="L0002" continued-from="L0001">
      <list-item><p> List item 3</p></list-item>
      <list-item><p> List item 4</p></list-item>
    </list>
  </p>
</sec>
<p>
  <list list-type="alpha-lower">
    <list-item><p>List item 1</p></list-item>
    <list-item><p>List item 2</p></list-item>
  </list>
</p>
<p>
  <list list-type="alpha-upper">
    <list-item><p>List item 1</p></list-item>
    <list-item><p>List item 2</p></list-item>
  </list>
</p>
<p>
  <list list-type="roman-lower">
    <list-item><p>List item 1</p></list-item>
    <list-item><p>List item 2</p></list-item>
  </list>
</p>
<p>
  <list list-type="roman-upper">
    <list-item><p>List item 1</p></list-item>
    <list-item><p>List item 2</p></list-item>
  </list>
</p>
<p>
  <list list-type="simple">
    <list-item><p>List item 1</p></list-item>
    <list-item><p>List item 2</p></list-item>
  </list>
</p>
The <def-list> element should be used to a tag lists in which each item consists of two parts: 1) A word, phrase, term, graphic, chemical structure, or equation that is paired with 2) one or more descriptions, discussions, explanations, or definitions of it. Typical use cases would be to tag a list of definitions or a full glossary of terms.
A <def-list> may take a <label> that provides it with a number or other designator, followed by an optional <title> naming the entire list, followed by optional headings for terms and their definitions. <term-head> contains the heading over the first (term) column, and <def-head> contains the heading for the second (definition) column; neither serves as a container element for terms or definitions. Individual <term>s and their <def>s are paired in <def-item>s. Definition lists are recursive, so following all the terms and definitions, there may be one or more embedded <def-list> elements.
Each <term> element should be assigned an ID attribute, which should be unique within the document. All ID attributes assigned to <term> elements should begin with the character “G” followed by a 4-digit number, beginning at “G0001”.
If an article contains a full “Glossary of Terms” section, then the <glossary> element should be used to capture this, typically within the <back> section of the article. The <glossary> element should be placed within a <sec> with <sec-type> attribute @glossary. If the glossary is part of an appendix, then the <sec> containing it should be placed within appendix tags (see documentation on appendices for more information). A simple <glossary> may contain only a title and a <def-list>. A more complex <glossary> may be divided into several different lists of terms, each headed by a title that describes the audience for the particular terms.
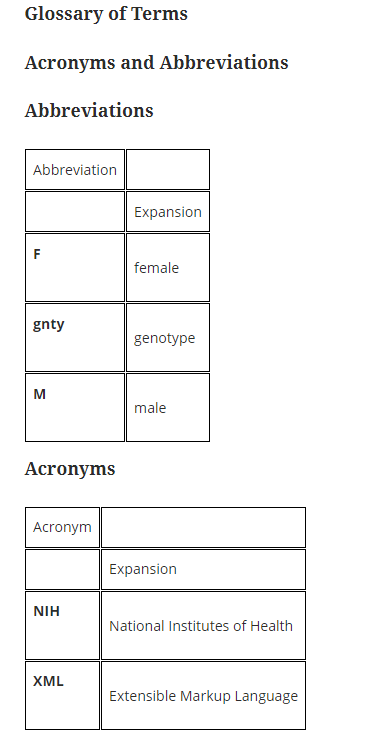
Example <def-list> tagging within <glossary>:
<sec id="S0017" sec-type="glossary" disp-level="1">
  <title>Glossary of Terms</title>
  <glossary>
    <title>Acronyms and Abbreviations</title>
    <def-list>
      <title>Abbreviations</title>
      <term-head>Abbreviation</term-head>
      <def-head>Expansion</def-head>
      <def-item>
        <term id="G0001">F</term>
        <def><p>female</p></def>
      </def-item>
      <def-item>
        <term id="G0002">gnty</term>
        <def><p>genotype</p></def>
      </def-item>
      <def-item>
        <term id="G0003">M</term>
        <def><p>male</p></def>
      </def-item>
    </def-list>
    <def-list>
      <title>Acronyms</title>
      <term-head>Acronym</term-head>
      <def-head>Expansion</def-head>
      <def-item>
        <term id="G0004">NIH</term>
        <def><p>National Institutes of Health</p></def>
      </def-item>
      <def-item>
        <term id="G0005">XML</term>
        <def><p>Extensible Markup Language</p></def>
      </def-item>
    </def-list>
  </glossary>
</sec>
The above tagging produces front-end display output like this: